Using Clubdeck and Loopback for Clubhouse

I’ve been using Clubhouse, the new audio-only social media app for iPhone since January. It works pretty well. Sort of like being at a big conference where you can pop your head into any room and listen to what people are saying. The rooms are user-generated and moderated, so even though anyone can come in, the moderators get to decide who can speak on stage. So it’s not quite as much of a free-for-all as Facebook or Twitter.

Anyway, one of the things I wanted to do was play some music in a room. That isn’t really possible on the iPhone because the app uses your phone number (like a phone call) and the phone only has one audio feed that is used for the mic with your own voice. So you could play music in your room and feed it through the mic, but that’s not idea.

Some folks on Clubhouse suggested I try iRig 2, so I ordered that but when it arrived it didn’t work for me. I didn’t yet have a 1/8 to 1/4 jack cord to send audio from my computer to the iRig. The iRig looked more designed for people who want to play an electric guitar or keyboard and plug it into their phone. So I googled around to see if there was another solution.

And I found Clubdeck, a free app for desktop or laptop (Mac and PC) that emulates the iPhone Clubhouse app on your computer. What it does is take your pone number and then re-route and emulate your phone on your computer over the Internet. (If you have used WhatsApp on your computer it’s pretty much the same type of thing.) The Clubdeck user interface is pretty good and has almost all of the features that Clubhouse does. Plus you can see different things at one time, like the room you are in and the hallway and someone’s profile.

But I also wanted to try to feed audio to Clubhouse from the Music app or from a browser, so I needed another app that could combine that audio stream with the mic picking up my voice. And I found Loopback from Rogue Amoeba. It’s a free download for a 20 minute trial, but then you need to pay a $99 license fee.

I found some good articles about Loopback, but none that explicitly described how to do what I wanted it to do. So here’s the setup that worked for me. The only thing else I needed were headphones, like the ones that came with my iPhone which I could plug into my laptop.

When you use Loopback, you set up a “Device” (which you can re-name) and then have three columns for Sources, Output Channels and Monitors. The Sources are the inputs that you potentially want to combine. In my case it was the Built-in Microphone, Clubdeck, Google Chrome and Music. When you create a Device, Loopback creates a Source called Pass-Thru, but you can delete that once you’ve added the sources you need.

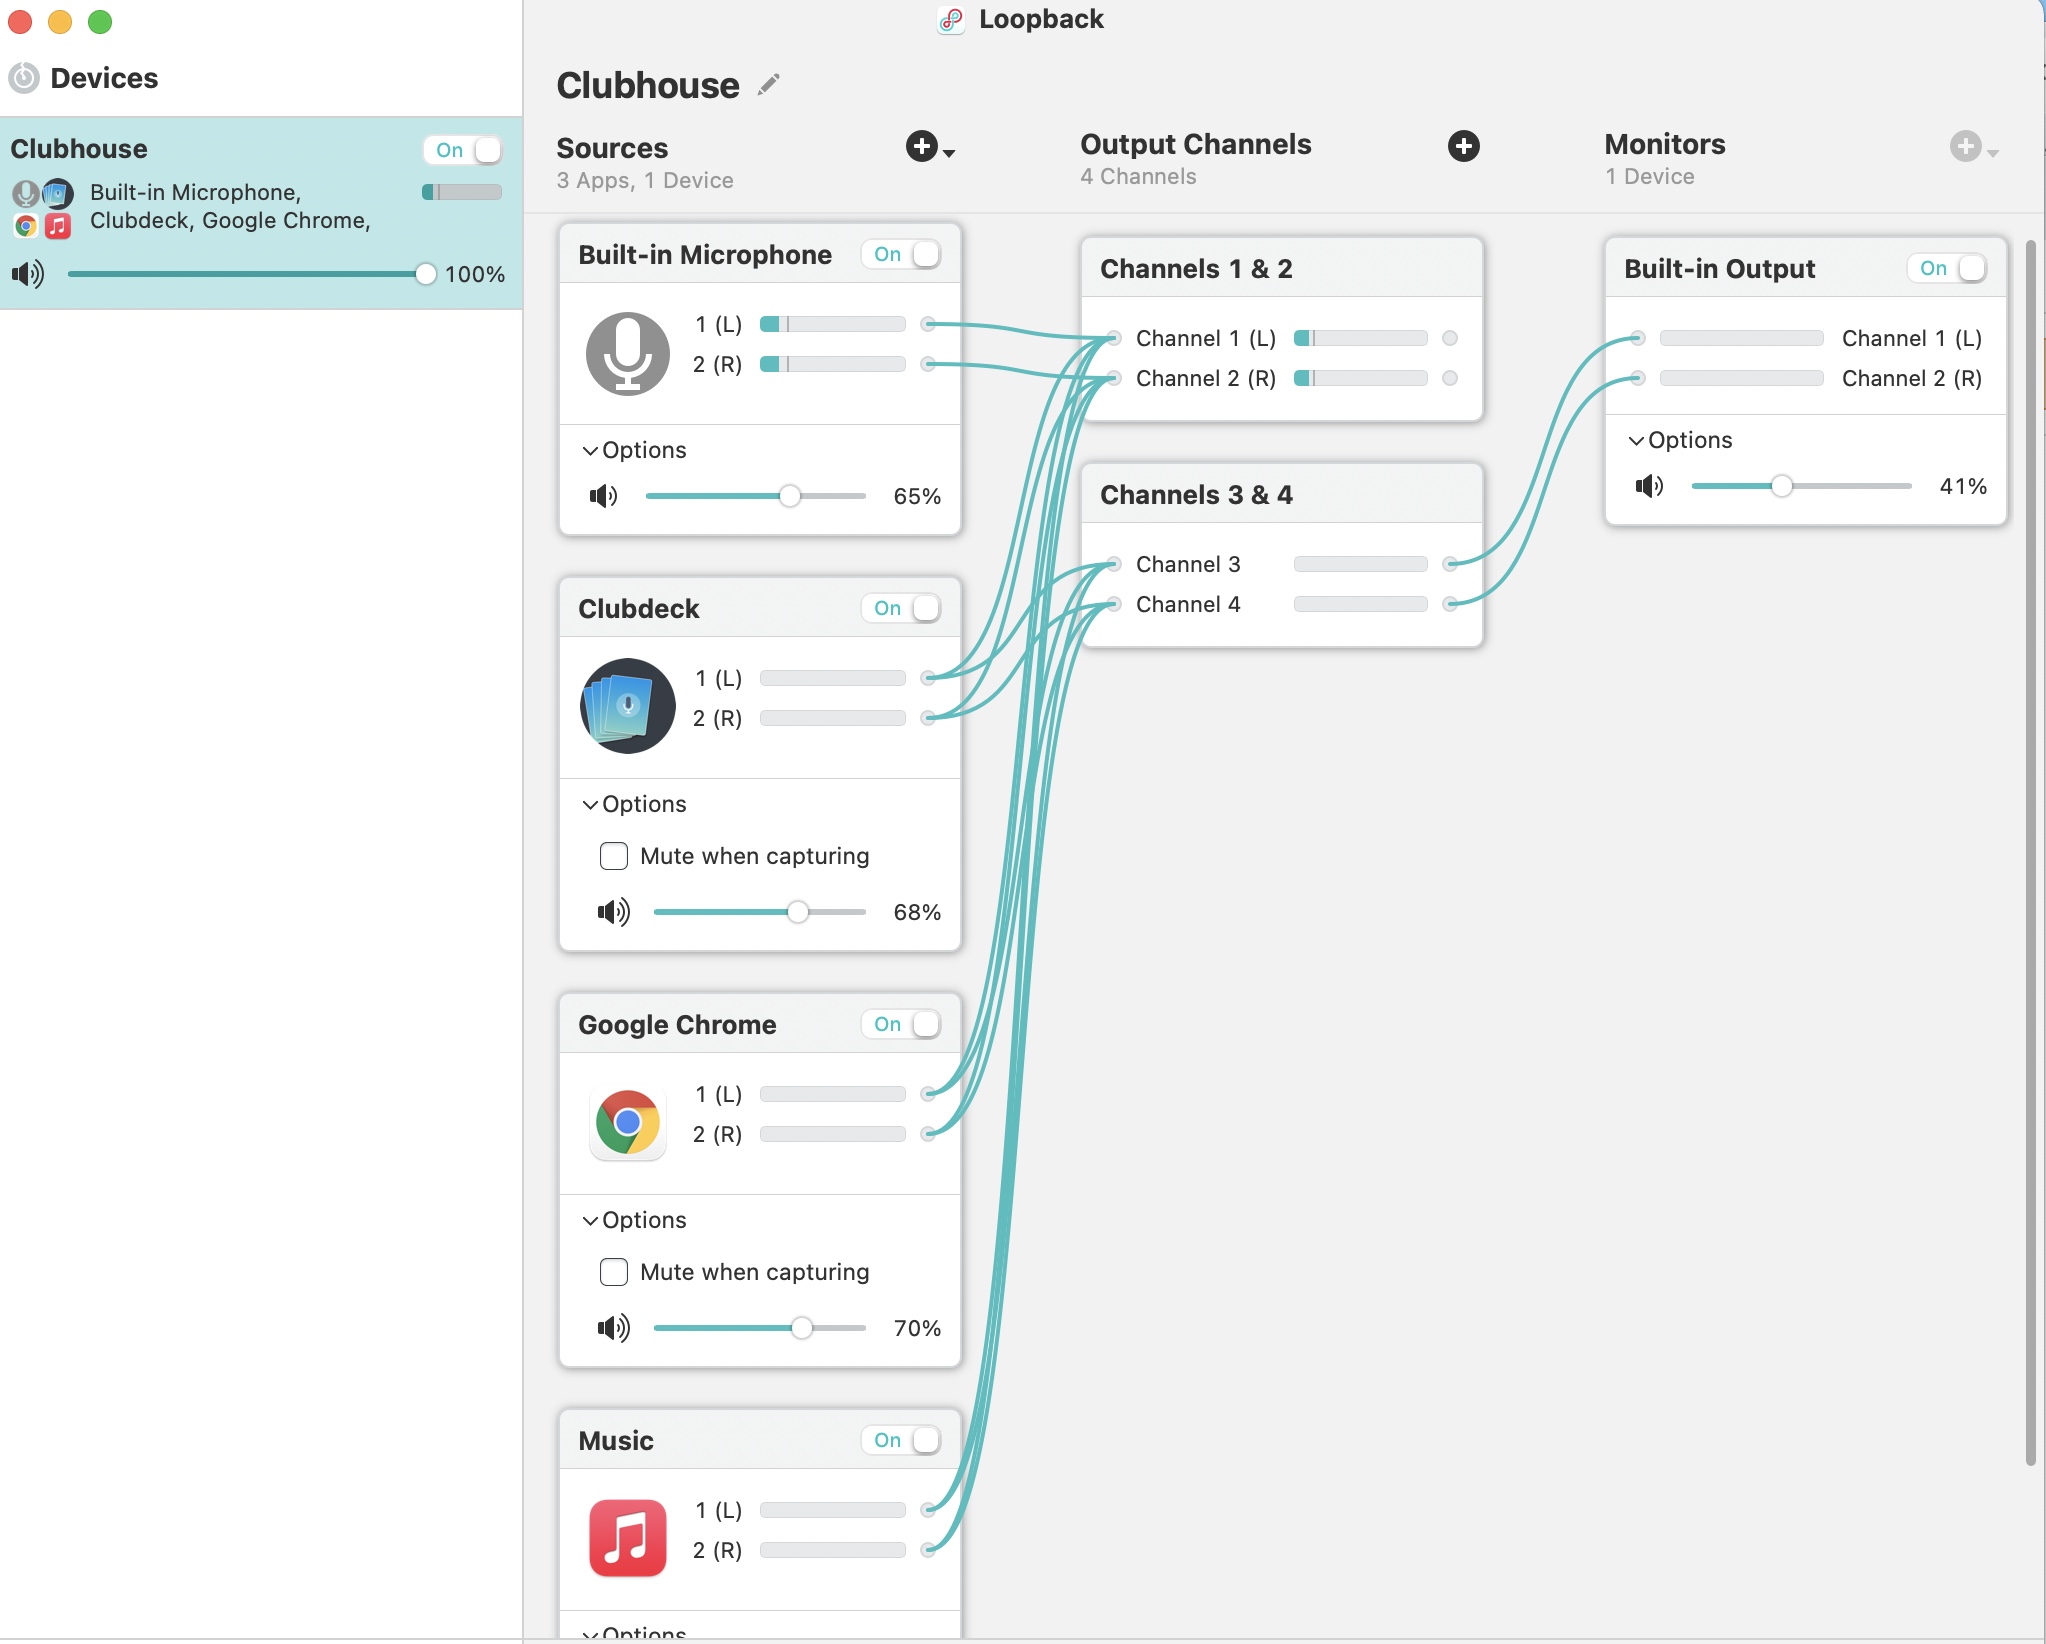
Next you need to set up two Outputs (each with two channels for left and right). The neat thing about Loopback is that you can delete or draw connections between the Sources and the Output Channels however you want. I connected the first Output Channel (Channels 1 & 2) to all four of the Sources. But for the second Output Channel (Channels 3 & 4), I connected Clubdeck, Google Chrome and Music, but NOT the Built-in-Microphone. This is important because I don’t want to be able to hear my voice from the Built-in-Microphone in my headphones. I then set up a Monitor called Built-in-Output in the third column that is connected only to the second Output Channel (Channels 3 & 4), the one without the Built-in Microphone.

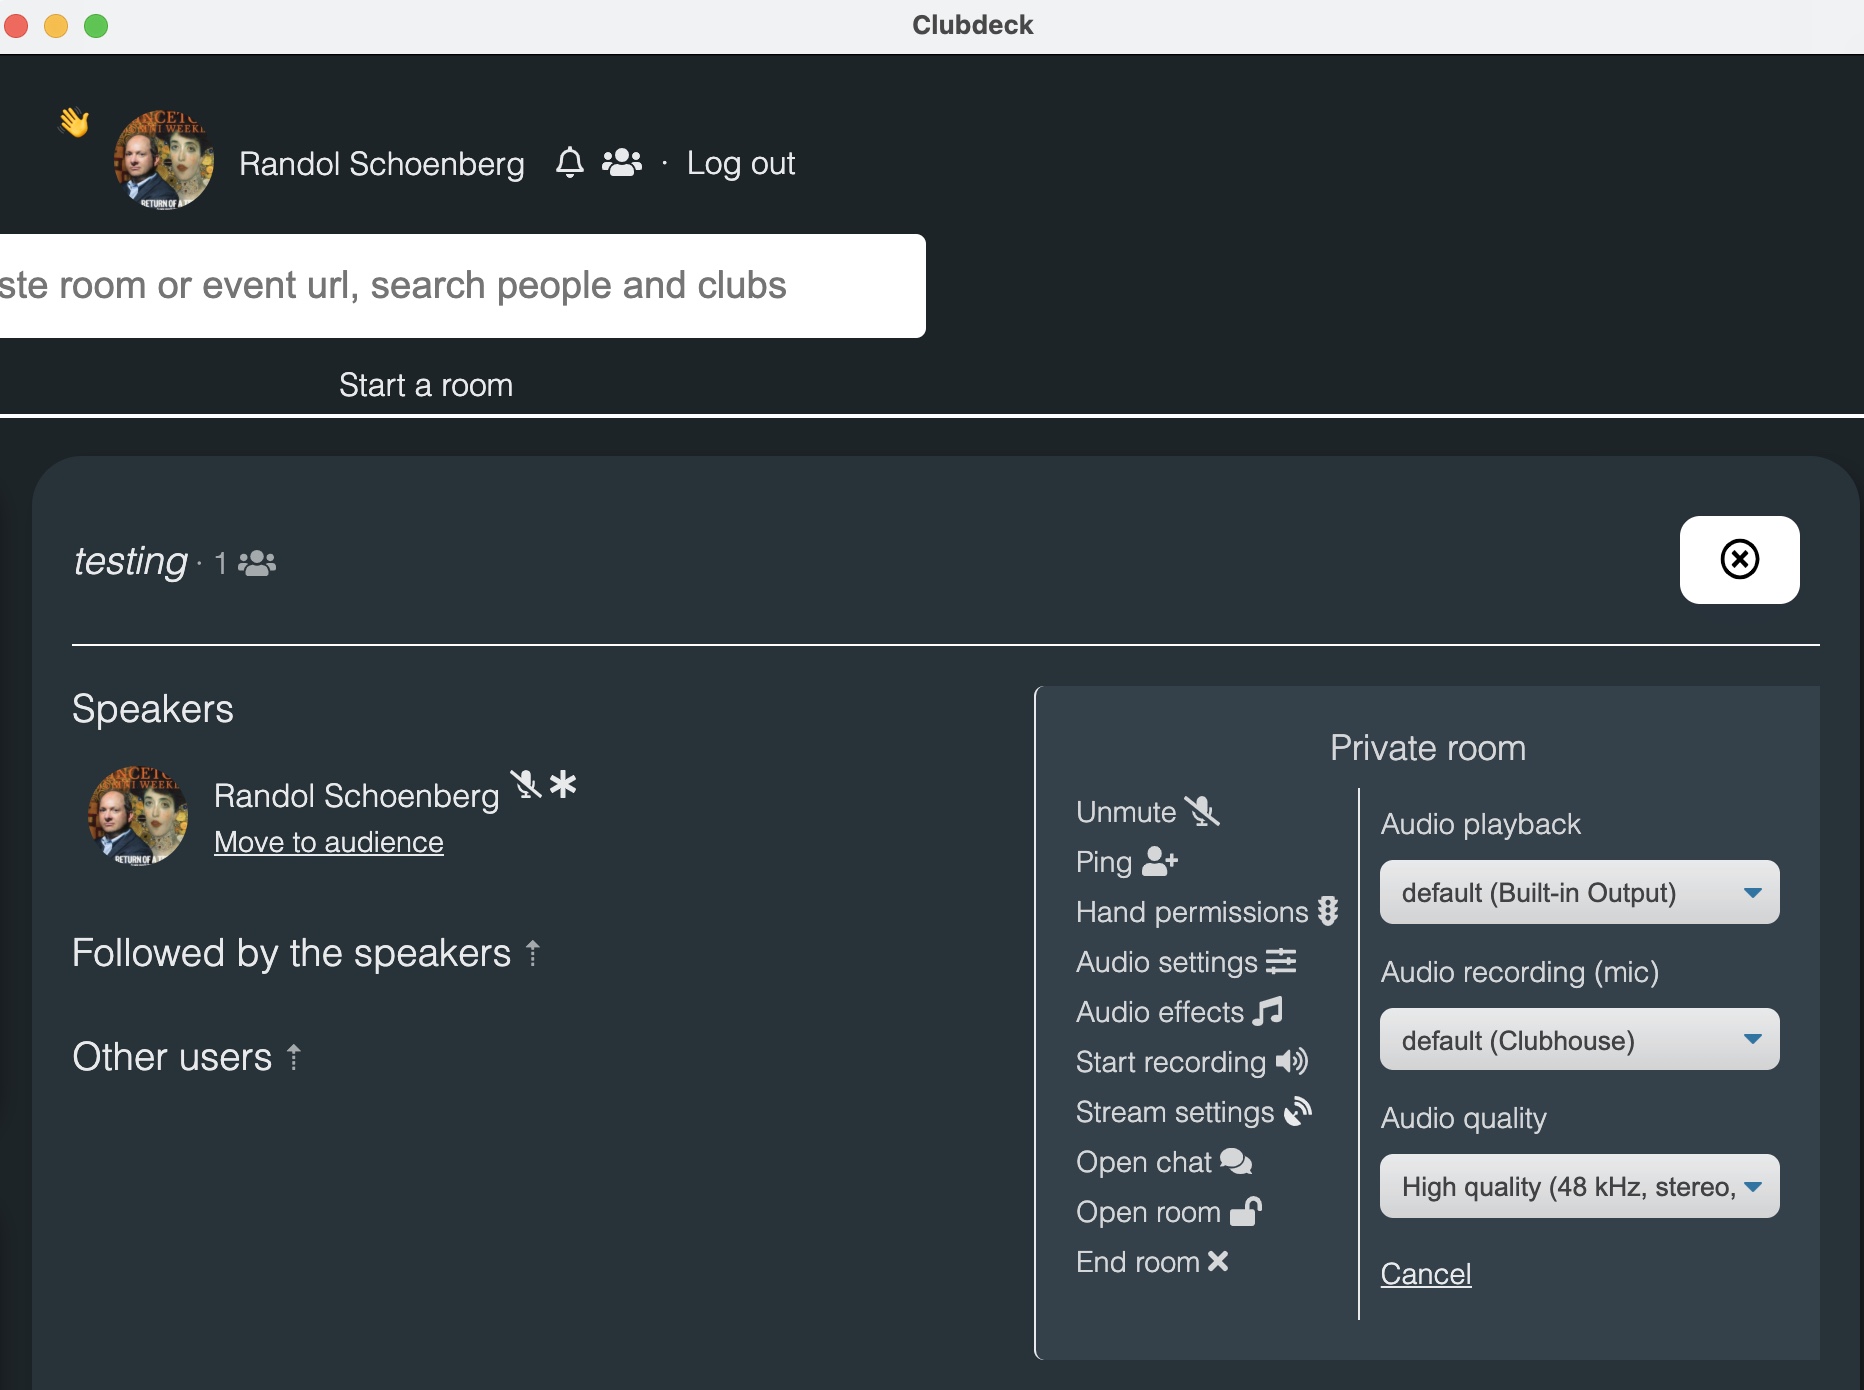
When I am on Clubdeck, I need to set the Audio settings so that the Audio playback is set to the default (Built-in Output) which is the Monitor we just created on Loopback without the Built-in-Microphone, and the Audio recording (mic) is set to the default (Clubhouse), which is the Device we just created on Loopback that combines all of the inputs Sources for us.

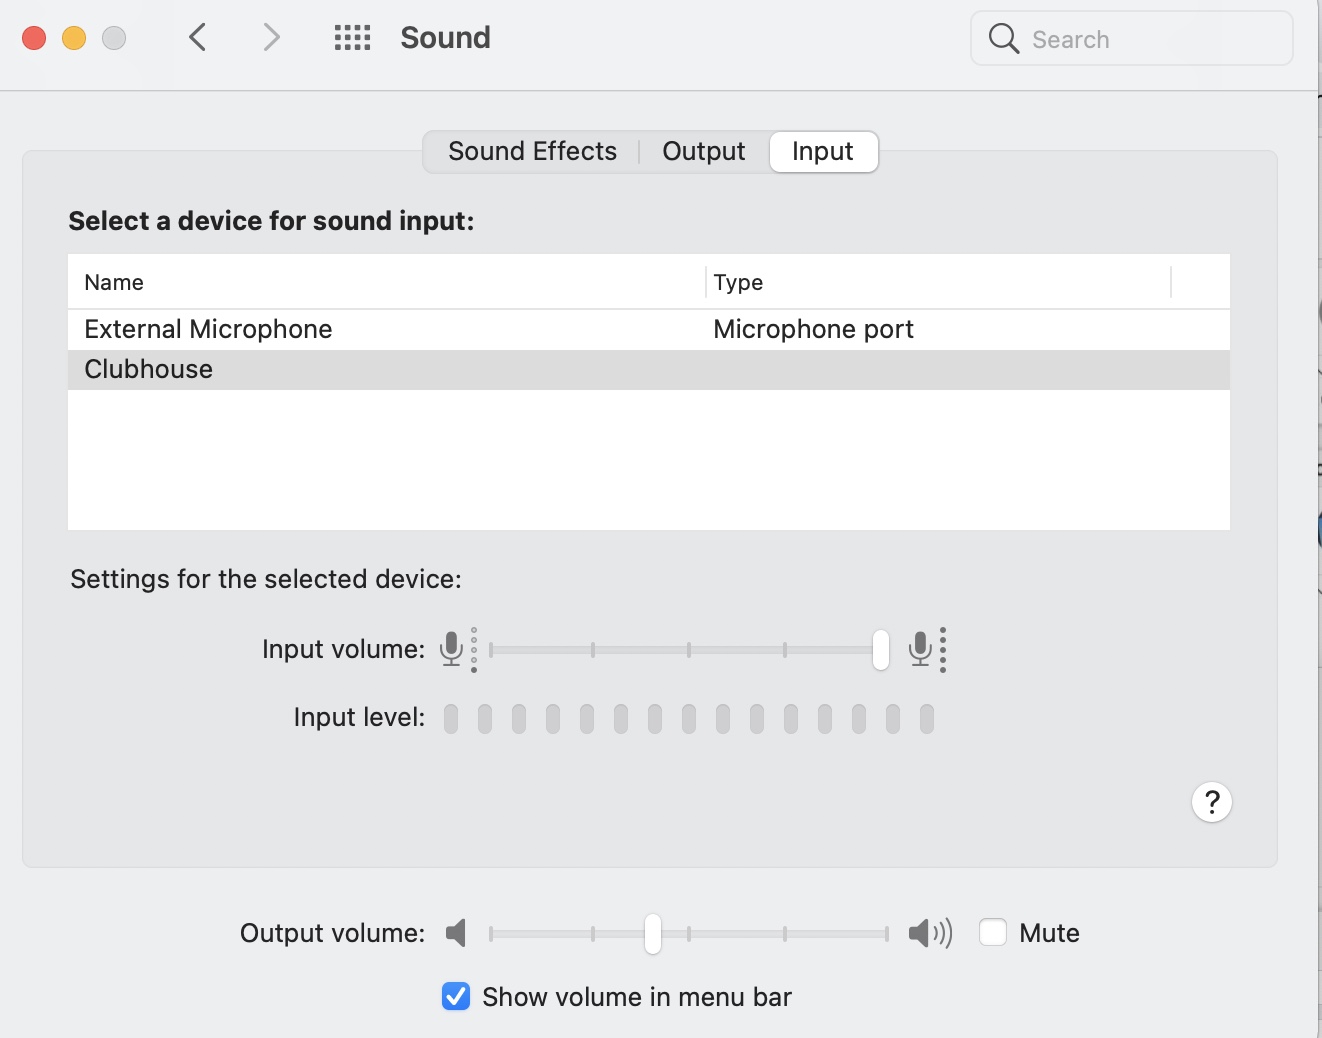
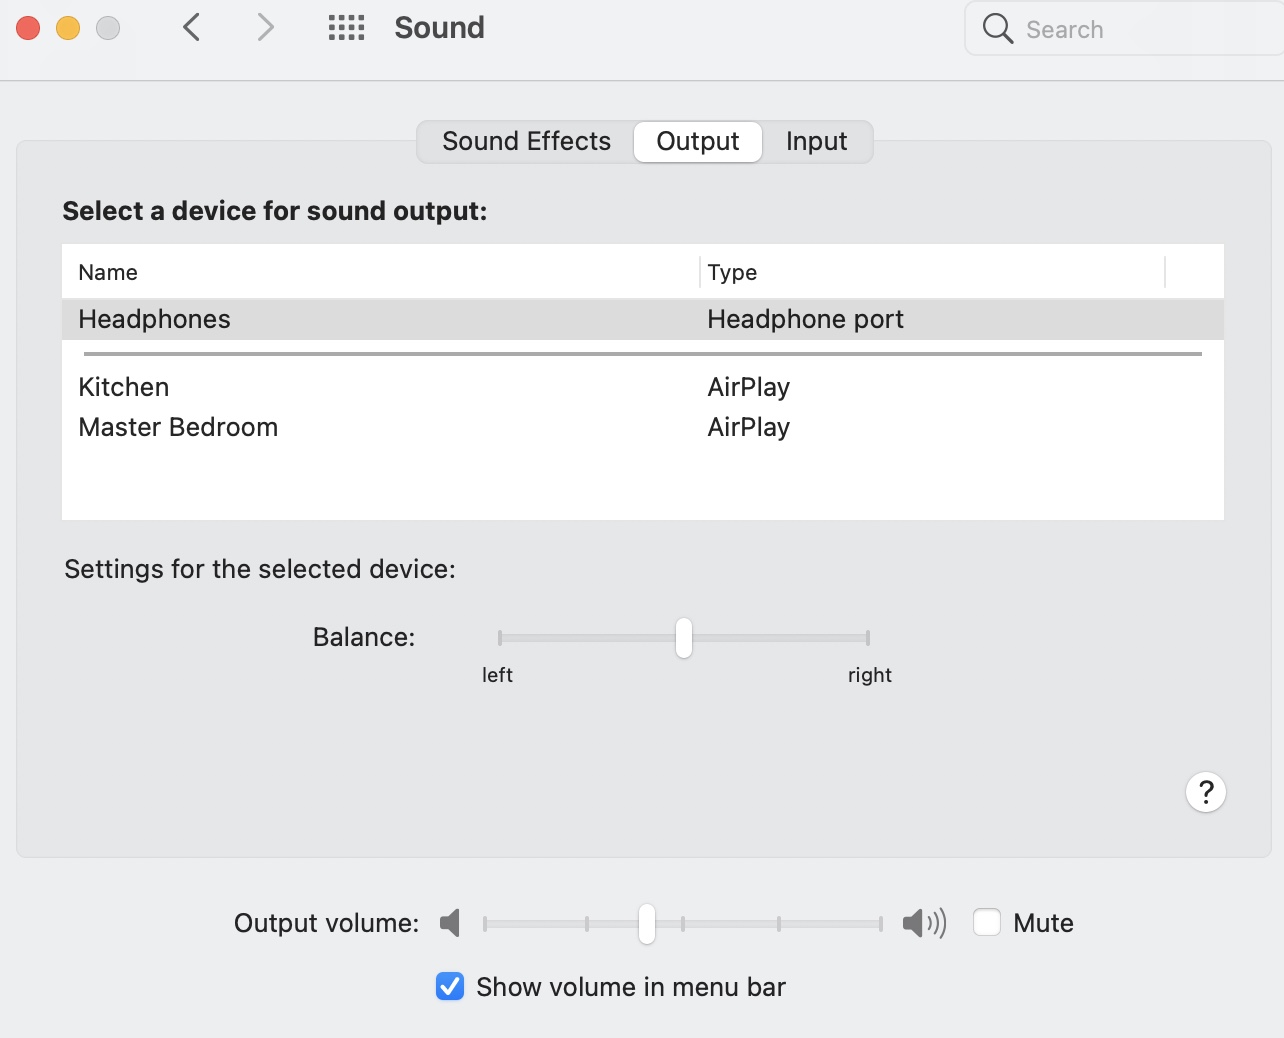
Finally, I went to my laptop’s System Preferences: Sound and selected the Input as Clubhouse (the name of the Device I created on Loopback). For Output I selected my Headphones. This way I hear on my headphones the same as what everyone else hears on Clubhouse, without adding in an annoying and slightly-delayed version of my own voice. The Sound preferences give you ways to adjust the Input level and Output volume, and Loopback also gives me lots of options for monitoring and adjusting volume from those sources.

I hope this helps. It took me a while to figure this all out, and I wanted to record it for myself in case I need to set it all up again.

How to use Y-DNA and Geni.com to improve your family tree

When most people talk about using DNA for genealogy research, they are talking about autosomal DNA, which is most of the DNA you get from your parents. It can be difficult to use autosomal DNA for genealogy because the matching segments can come from either your father or your mother, and it’s hard to figure out which side. But with Y-DNA, you know where it comes from. Y-DNA is passed only from father to son. As a result, only men can test their Y-DNA. The results can be useful to study the origin of surnames, and to find families with different surnames who have common paternal ancestor.

Although Ancestry, MyHeritage and 23andMe have all built enormous DNA databases that can be used for genealogy, the company with the largest Y-DNA database is familytreedna.com. A basic test can cost $99, while the most detailed Y-DNA test, currently the Big Y-700 costs $379. If you are male, you can take the test yourself and get results for your paternal line. But it is worth exploring how we can use Y-DNA to find out about other ancestors. The key is finding a male line descendant to test.

We each have two grandfathers. Your Y-DNA test will give you the Y-DNA that comes from just one of them, your father’s father. But what about your mother’s father? You don’t have the Y-DNA from him, but if you can find a male line descendant, you can get that information. I tested my mother’s first cousin, the son of her father’s brother, to get the Y-DNA of my maternal grandfather. The same process can be used to get Y-DNA from your other male ancestors. You just need to go up the tree to that ancestor and then trace back down on the male line. if you can find a male-line descendant, you can test him and get the Y-DNA that will help you learn more about the origins of that ancestral line.

Geni.com offers several tools that can help you find male line descendants of your ancestors. Geni.com also has a DNA feature that works together with familytreedna.com, so you can easily upload and link your results, both Y-DNA and autosomal, and find matches on Geni. Here are the methods I use to find people who can provide Y-DNA for my ancestors:

If you go to your profile page on Geni (which you can get to by clicking on your name in the upper right corner of your home screen and selecting View Your Profile), you can use the Actions menu button in the upper right to generate an Ancestor Report.

The Ancestor Report (which you can also generate from any profile on Geni, not just your own) allows you to see a nice display of all of your ancestors. You can adjust the number of generations it shows, up to twenty (which should be plenty).

Let’s say I am looking for a Y-DNA descendant for my father’s mother’s father, Rudolf Rafael Kolisch in the example above. Because he isn’t on my paternal line, I need to find another person to test. Clicking on his name in the ancestor report will take me to his profile page. From there I scroll down until I see a row of tabs beginning with Overview. The last one is DNA.

When I click on the DNA tab I get a display with a number of different options. Under the big green box where they are trying to get me to buy a DNA kit from MyHeritage (which doesn’t even work yet with Geni, even though they are the same company) you can see the section for Y-DNA (paternal line only). The blue hyperlink under the Y-DNA section says View a list of living people who can be tested for Y-DNA that should match Rudolf Rafael Kolisch. I want to click on that.

When I click on the blue hyperlinked text to view the people I can test, it takes me to a new page which lists the potential Y-DNA candidates. For my great-grandfather Kolisch, there is just one, my third cousin Petr Kolisch. He is the only male-line descendant of my great-grandfather Rudolf Rafael Kolisch, the only one in the family who can provide his Y-DNA.

You can actually get to this type of page from anywhere on Geni. All you have to do is click on the Family tab at the top of the page and select Lists.

Once you are on the Lists page, you can use the advanced controls and choose the Focus Person, choose the Group Y-DNA Relatives, and Refine the List to just Living people to find potential Y-DNA relatives (not just descendants) of the Focus Person who could be tested. If you filter for Users only, you’ll get a list of Geni users who could be tested and you can easily click to send them a message asking if they are willing to take a Y-DNA test. (One tip: when selecting the focus person, sometimes it helps to use the profile id number, which is the long number in the url/internet address of the person’s profile page. So for example, my profile page is at https://www.geni.com/people/Randy-Schoenberg/6000000002764082210 and my profile id is 6000000002764082210.)

There are a few other tricks you can use on Geni. The first is to try to send a message to all of the Geni users who are descendants of an ancestor. First you go to your mailbox, which you get to by clicking on the little box next to the search field in the upper right and selecting Inbox Messages.

Then you click on Compose, the blue box over on the left.

Next, underneath the To: field there’s a row of options and the last one is Descendants of. Click on that.

It will ask you to type in the name of the profile, but you can also use the profile id number here, which may work better.

Once you have selected the profile, Geni will populate the address field with all of the Geni users who are descendants of the profile (up to a limit). This isn’t just the male-line descendants but it’s sometimes useful to cast a wide net and contact all of the descendants of your ancestor who are Geni users, in case one of them is in contact with a Y-DNA descendant who is not on Geni.

Finally, there are several ways to use descendant charts to find descendants. On Geni, similar to the Ancestor Report, you can use the Actions menu to create a Descendant Report for any profile.

The Descendant Report is not limited to male line descendants but it can be very useful anyway, especially if there are male lines that still need to be developed. Often people leave off the living relatives on Geni and so you may need to identify those branches that still need to be explored and filled out.

There is also an application called HistoryLink created by a Geni curator, Jeff Gentes, which you can use to identify male-line branches and descendants. Go to https://historylinktools.herokuapp.com/ and click on Ancestor Graph in lower right corner.

You’ll need to authorize the app (by logging into Geni if you aren’t logged in yet). It looks initially like it only creates an Ancestor graph, but you can change that to descendants. First change the focus person (once again having the profile id number is a real help), and then click to change Ancestors to Descendants. Then you can select the number of generations (up to 15 for a Descendant Graph) and you can even limit the results to just the male Y-DNA lines. Then click to Build Graph. It creates both a circular graph and an ordinary descendant chart with links to the Geni profiles. This technique is especially useful in identifying male lines from more distant ancestors that might still need to be built out so you can find a male line descendant to test.

Using all of these techniques you can begin to collect Y-DNA samples from the male line descendants of each of your male ancestors. It’s a great way to learn something new, perhaps something deeper than what your ordinary paper-trail genealogy can tell you.

Postscript: If you are testing Jewish Y-DNA you should definitely join the Avotaynu DNA Project, which is an academic study of Jewish Y-DNA results.